
Steps to Beginning Watercolor Painting
Updated on September 21, 2017
How to Paint Watercolor
So you would like to try your hand at watercolor painting? Here are three baby steps to take before you can take off full speed ahead:
- Assemble the proper supplies
- Familiarize yourself with the brushes and paints
- Practice a simple landscape
Step #1: Assemble Supplies
To begin, you can start with basics and still produce lovely paintings. Here's what you'll need:
Basic Brushes
Buy four good quality sable or synthetic watercolor brushes. You can add more later if you wish. I prefer sable brushes, but some artists like the synthetic ones because they are not quite as soft.
- #4 round
- #8 round
- #10 round
- 1" flat wash brush
Good Watercolor Paper
Good paper is expensive, but it will make a difference. Get at least 140 lb weight paper in a watercolor block or single sheets. Look for 100% cotton, acid free paper. You can use less expensive paper for your practice, but you'll find that every painting looks better on fine quality paper.  I like Arches or Windsor Newton 140 lb. or 300 lb. cold press watercolor blocks. Some water colorists prefer hot press paper which is smoother. It's a matter of preference.
Palette
You can use a large, plain white dinner plate to start out or purchase a white plastic palette with at least six or eight wells and a flat place to mix your paints. Later, you may want to invest in a covered plastic palette, as it will be easier to protect your paints from dust and reuse them.
Water Jar
Use a glass or plastic container that holds about a cup of water. You may even want two water jars, one for rinsing your brush and a clean one for wetting your paper.
Paper Towels or a Soft Cotton Cloth
Fold up a cloth or some white paper towels to keep near your palette to blot excess water or paint off your brush.

Paint
Watercolor paints come in pans or tubes. A basic set will contain eight to ten colors. I prefer tube colors, but good quality pan colors are fine. Purchase student grade or professional grade watercolors. You will find that each artist has their own idea of what a basic set contains. This is my list of basic colors:
- new gamboge yellow
- yellow ocher
- burnt sienna
- sepia
- cadmium red
- alizarin crimson
- cerulean blue
- hookers green
- Payne's gray
- a neutral tint
Fold up a cloth or some white paper towels to keep near your palette to blot excess water or paint off your brush.

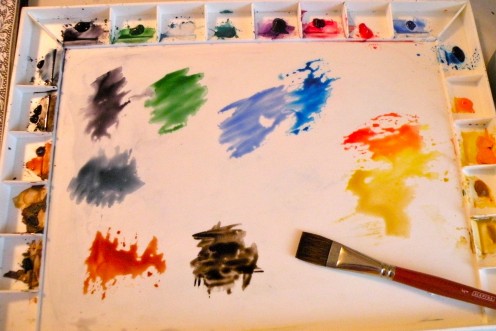
Step #2: Become Familiar with Your Materials
Before starting your first painting, it is important to become familiar with the way your paints, bushes, and paper work together. Practicing a few different methods will help you when you are aiming for different textures, smooth blending of colors, or a gradient of one color.
Set up your palette.
- If you are using a plate, then just squeeze a few colors on the edge, spaced far enough apart so they don't run together. If you have a palette with wells, you can squeeze each of your colors into one of the wells.
Test the dilution of color.
- With a wet brush, pick up some of the paint and swirl it around in the center of your palette. Add more water with your brush if the color doesn't move around freely. Stroke a few strokes of paint onto a practice piece of paper and try spreading it out to produce a gradient from darker to lighter.
Experiment with different brush strokes.
- Try some broad, flat strokes with your flat wash brush. Try dipping one of your round brushes in water and turning it to make a fine tip. Pick up some paint and draw some fine lines.
- With the same brush, pick up some color on the flat edge of the brush and use just the edge to create lines or grasses.
- Load a round brush with more paint and use it on its side to create a texture that skips across the paper.
- Pick up a bit of paint on the tip of a round brush, spread the bristles flat, and try dry brushing on dry paper for a feathery look.

Step #3: Practice Basic Techniques
Here are a few basic techniques you should practice before attempting a painting:
Broad, flat strokes for large, smooth areas.
Use your 1" wash brush to mix a color with some water, making a puddle of paint on your palette. Pick up the color with your dampened brush and brush a smooth area with the color.
Gradient.
A monochrome gradient is painted by using strong color at first, then adding water to thin and lighten the color. Since you do not add white to watercolors, you will get light colors by applying thinner application of the same color.
Use the edge of a flat brush for sharp lines.
Make sharp, dark lines with the edge of a 3/4" flat brush. This technique is excellent for grasses or deep, straight shadows. Load the edge of your brush with color and practice using the edge of the brush to make deep lines.
Since you do not add white to watercolors, you will get light colors by applying thinner application of the same color.

Painting on Dry Paper
Painting on dry paper is a good way to get intense colors, detail, and texture in your work. As long as your brush does not have too much water on it, the paint will stay where you put it. You can use very tiny brushes to add fine detail or larger ones to create texture in wood or trees. Combining dry brush techniques with rough paper will leave white areas in the painting that will spark it with light.
Hint: If you intend to paint a soft background behind a building or tree with a lot of texture, be sure to do that first with a wet-on-wet technique. Your background should be perfectly dry before starting on the textured areas or they will run.
Combining dry brush techniques with rough paper will leave white areas in the painting that will sparkle with light.
Using the Point of a Round Brush
A good quality round brush will form a point if it is rolled slightly as it is loaded with paint. Use a light touch to paint fine straight or curved lines with the pointed tip of your round brush.
Painting Textures with Dry Brush Techniques
Painting with a fairly dry brush onto dry paper is a great way to create rough textures. Load a damp #10 round brush fairly heavily with a dark color. Use the brush on its side and pull it up along a tree trunk or a barn board. The paint will skip slightly, giving some very dark texture with white highlights.

Practice Wet-On-Wet Painting to Blend
- Use your 1" flat brush to wet a 6 inch square of paper. If the paper is too wet, blot gently with a paper towel to pick up excess water.
- With the same brush, mix some gamboge yellow with water and apply to the top one third of the area.
- In the middle third, paint a fairly wet strip of sap green.
- On the bottom third, paint a strip of Payne's gray.
- Pick up the paper and tilt it slightly to let the colors blend into each other.

Step-By-Step Practice Landscape
Click thumbnail to view full-size


, roughly paint in a tree trunk and some branches.")


Painting a Practice Landscape Using Wet and Dry Techniques
Painting on wet paper can give backgrounds and skies a delicate blend of colors that flow into each other. Wet-on-wet painting is a good technique for landscape. With a little practice, you can learn to put just the right amount of water on your paper to achieve the look you want. Here is an exercise to try painting wet-on-wet for a delicate sky:
1. Unless you are using a watercolor block, tape your paper to a flat board as shown.
2. Use the large, flat wash brush to wet down your whole piece of paper and spread the water so that the paper is wet, but there aren't any puddles.
3. Choose a sky color. (For this exercise, I used cobalt blue.) With a 1" flat brush, paint a smooth coat in the sky, darker at the top of the paper and lightening up as you get to the horizon line. Now dip your dampened brush into a neutral tint or Payne's gray and add a few cloudy areas. Do not brush it around. If your paper is still fairly damp, the gray will blend into the blue while still keeping the cloudy shapes. (See illustration.)
4. Let background dry naturally or with a hair dryer before continuing.
Hint: Don't overwork the sky or clouds. Once the color is on the paper, let the colors flow into one another for a natural, soft look.
5. Use the edge of your flat brush to pull out some grasses from the deeper green areas.
6. Add a few clusters of tree trunks along the horizon, then paint in some foliage on the distant trees. Deepen green shadows.
7. Using natural tint on a round brush (fairly heavy and dry), roughly paint in a tree trunk and some branches.
8. If you wish to paint some foliage on the tree, wet irregular areas where the leaves will go and drop in some bits of yellow ocher in the branches and on the ground.
9. While the paper and color is still wet, add some areas of cadmium red and sap green. The colors should flow together slightly.

Conclusion
When you feel comfortable with your supplies, go on to try painting some simple subjects or landscapes. Every painting does not have to be perfect. Keep experimenting and enjoy the creative process!
No comments:
Post a Comment